

제가 개발 중인 이길어때 프로젝트는 최근 SNS 서비스 형태로 확장되고 있습니다.
SNS라면 빠질 수 없는 기능이 바로 실시간 알림이죠.
좋아요, 댓글, 팔로우 같은 사용자 행동을 바로 알려주면 서비스의 사용성이 크게 좋아지기 때문입니다

이번 글에서는 Spring에서 SSE(Server-Sent Events) 로 실시간 알림 기능을 구현하는 방법과,
운영 환경에서 실제로 마주쳤던 다중 서버 환경 문제를 Redis Pub/Sub으로 해결한 경험을 정리했습니다.
이 글을 읽으면 다음과 같은 내용에 대한 이해를 얻을 수 있을거에요 :)
- 폴링 / 웹소켓 / SSE 중 알림 시스템에 적합한 방식 고르기
- Spring SseEmitter로 SSE 알림 구현하기
- 다중 WAS 환경에서 SSE가 겪는 구조적 한계
- Redis Pub/Sub으로 여러 서버 간 알림을 공유하는 방법
- 운영 환경에서 챙겨야 할 안정성과 보안 요소
실시간 알림 방식 비교 — 우리는 왜 SSE를 선택했을까?
실시간 알림을 구현하는 방식은 크게 세 가지로 나눌 수 있습니다.
1. 폴링(Polling)
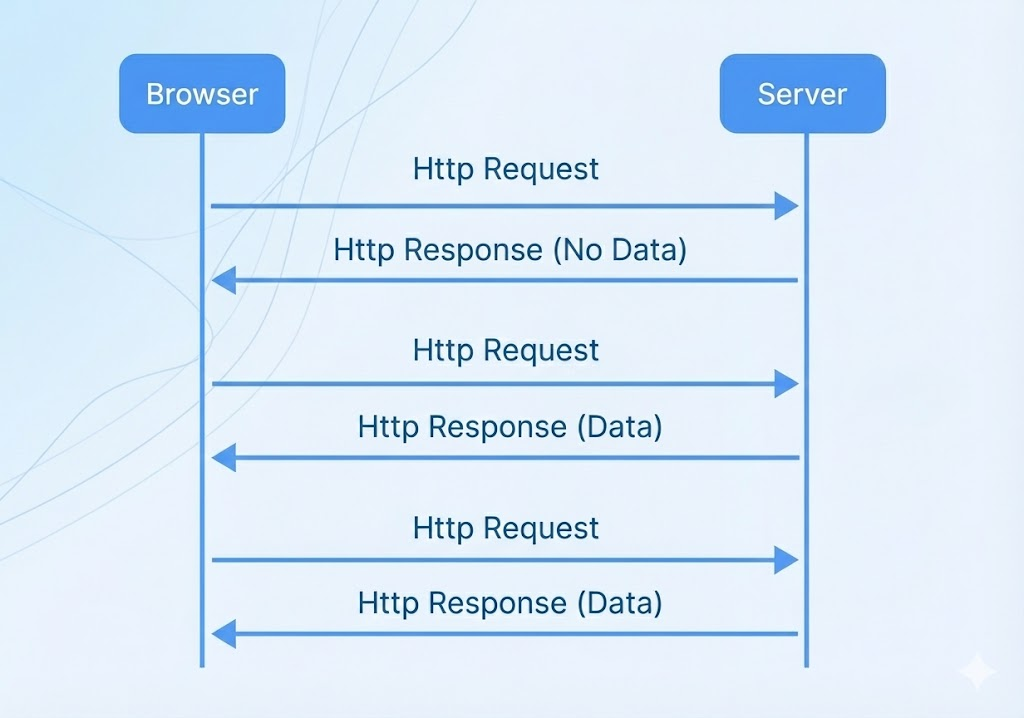
클라이언트가 일정 주기마다 서버에 새 알림 있나요?라고 묻는 방식입니다.
- 구현이 단순함
- 불필요한 요청이 많아짐
- 즉시성이 떨어짐
알림 시스템처럼 빠른 응답이 중요한 기능에는 적합하지 않습니다.
2. 웹소켓(WebSocket)

양방향 통신이 필요한 경우 가장 널리 쓰이는 방식입니다.
- 양방향 실시간 통신 가능
- 고성능 실시간 서비스에 적합
- 별도의 프로토콜을 사용해 인프라 구성 난이도가 높아짐
3. SSE(Server-Sent Events)

서버가 클라이언트로 단방향 스트림을 열어두고, 이 채널을 통해 이벤트를 푸시하는 방식입니다.
- 단방향 알림 전달에 최적화
- HTTP 기반이라 기존 인프라 변경이 거의 없음
- 연결이 끊어져도 브라우저가 자동으로 재연결
- 양방향 통신은 불가능
알림은 대부분 서버에서 이벤트 발생 → 사용자에게 알려주기 형태라서,
저희 서비스에서는 SSE가 가장 단순하고 효율적인 선택이었습니다.
Spring에서 SSE 구현하기
Spring MVC에서는 SseEmitter 클래스를 사용해 SSE를 비교적 간단하게 구성할 수 있습니다.
아래는 실제 서비스에 적용한 기본 구조입니다.
1. SSE 엔드포인트 만들기
@RestController
@RequiredArgsConstructor
public class NotificationController {

    private final NotificationService notificationService;

    @GetMapping("/api/v1/notifications/stream")
    public SseEmitter connect(@AuthenticationPrincipal User user) {
        return notificationService.createEmitter(user.getId());
    }
}
사용자가 /notifications/stream 요청을 보내면 서버가 SSE 연결을 열고,
해당 사용자에게 이벤트를 지속적으로 보낼 준비를 합니다.
2. 사용자별 SseEmitter 관리
@Service
@RequiredArgsConstructor
public class NotificationService {

    private final Map<Long, SseEmitter> emitters = new ConcurrentHashMap<>();

    public SseEmitter createEmitter(Long userId) {
        SseEmitter emitter = new SseEmitter(Long.MAX_VALUE);
        emitters.put(userId, emitter);

        emitter.onCompletion(() -> emitters.remove(userId));
        emitter.onTimeout(() -> emitters.remove(userId));
        emitter.onError((e) -> emitters.remove(userId));

        return emitter;
    }
}
여기에서 핵심은 사용자별로 SseEmitter를 저장해 관리하는 것입니다.
ConcurrentHashMap을 사용해 다중 요청 환경에서도 안전하게 관리- 연결이 끊기면
onCompletion,onTimeout,onError에서 정리 - emitter를 즉시 삭제해 메모리 누수를 방지
3. 알림 저장 및 전송
먼저 알림 엔티티를 정의합니다.
@Entity
@Getter
@NoArgsConstructor(access = AccessLevel.PROTECTED)
public class Notification {

    @Id @GeneratedValue(strategy = GenerationType.IDENTITY)
    private Long id;

    @ManyToOne(fetch = LAZY)
    @JoinColumn(name = "user_id")
    private User receiver;

    private String message;
    private boolean read;

    @CreatedDate
    private LocalDateTime createdAt;

    @LastModifiedDate
    private LocalDateTime modifiedAt;
}
알림 저장 후, 해당 사용자에게 실시간으로 전달하는 로직은 아래와 같습니다.
@Transactional
public void sendNotification(Long receiverId) {
    Notification notification = new Notification("알림 왔숑", receiverId);
    Notification saved = notificationRepository.save(notification);
    sendRealTimeNotification(saved);
}

private void sendRealTimeNotification(Notification notification) {
    SseEmitter emitter = emitters.get(notification.getReceiver().getId());

    if (emitter != null) {
        executor.execute(() -> {
            try {
                emitter.send(SseEmitter.event()
                        .name("notification")
                        .data(notification.getMessage()));
            } catch (Exception e) {
                emitters.remove(notification.getReceiver().getId());
            }
        });
    }
}
단일 서버 환경에서는 이 구조만으로도 실시간 알림이 문제없이 동작합니다.
하지만 실제 운영 환경에서는 서버가 여러 대로 분리되는 순간, 새로운 문제가 발생합니다.
문제 등장! — 다중 서버 환경에서는 왜 안 될까?
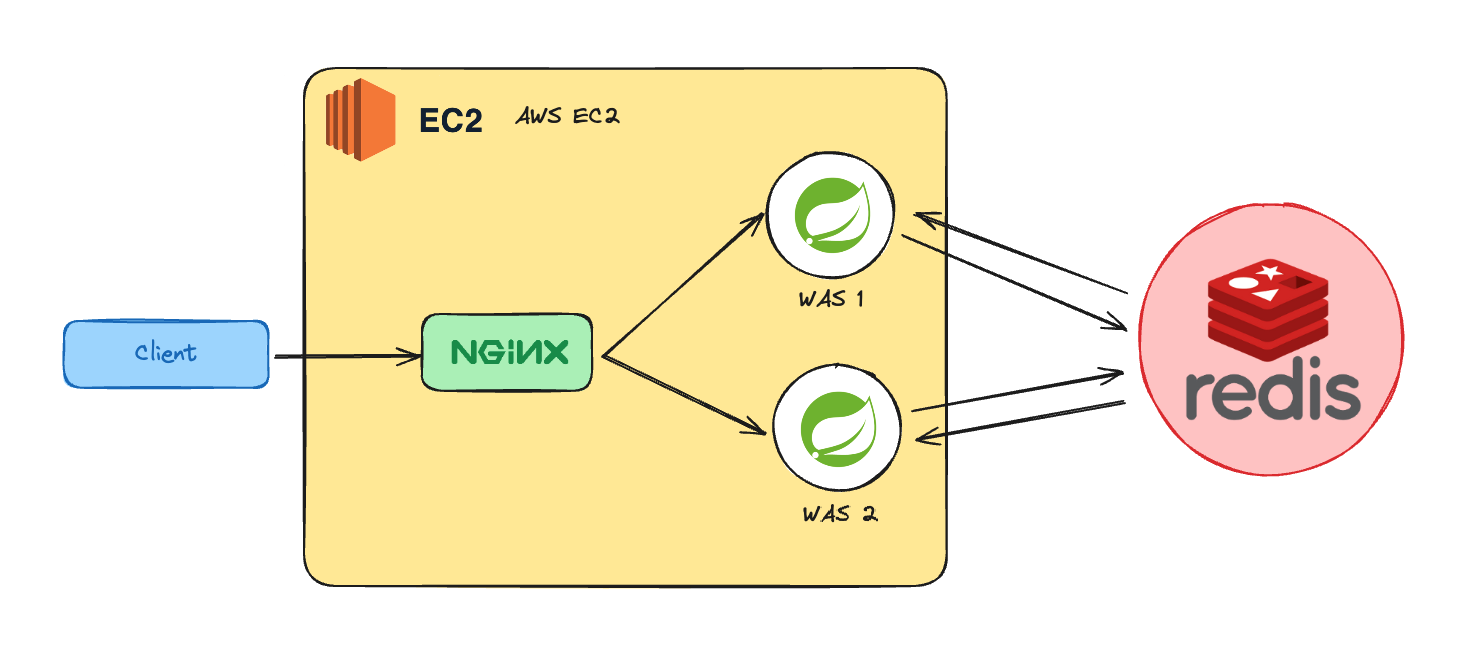
저희 서비스는 다음과 같은 구조로 운영되고 있었습니다.

SSE는 클라이언트와 특정 WAS 사이에 오래 지속되는 연결을 유지하는 방식입니다.
문제는 알림 생성 로직이 어느 서버에서든 실행될 수 있다는 점입니다.
예를 들어,
- 사용자 A는 WAS #1에 SSE로 연결됨
- 그런데 알림 생성 로직은 WAS #2에서 실행됨
- WAS #2에는 A의
SseEmitter가 없음 - → 알림이 전달되지 않음
즉, 다중 서버 환경에서는 연결 정보와 알림 생성 지점이 서로 다른 서버에 존재하는 상황이 쉽게 발생합니다.
스티키 세션을 사용해서 해결할 순 없나?
스티키 세션을 사용하면 사용자 A의 요청을 항상 같은 서버(WAS #1)로 보낼 수 있어 문제를 피할 수 있습니다.
하지만 다음과 같은 이유로 채택하지 않았습니다.
- 장애가 발생하면 세션을 유지하기 어렵고, 복구 과정이 번거로움
- 트래픽이 한 서버에 몰려 부하 분산 효과가 떨어짐
- Redis 세션 저장소를 이미 사용 중이라 세션 고정의 필요성이 낮음
결국 근본적인 해결책은 여러 서버가 알림 정보를 공유하도록 만드는 것이었습니다.
Redis Pub/Sub으로 SSE 스케일링하기
Redis는 기본적으로 가볍고 빠른 Pub/Sub 메시지 브로커 기능을 제공합니다.
이를 활용하면 각 WAS가 서로의 상태를 공유하지 않아도, 모든 서버가 동일한 알림을 받아 사용자에게 전달할 수 있습니다.
구조는 다음과 같습니다.
- 어떤 WAS에서든 알림이 생성되면 Redis에 publish
- 모든 WAS는 동일한 topic을 subscribe
- 메시지를 받은 WAS는 자신에게 연결된 사용자에게 SSE 이벤트 전송
이 방식으로 다중 서버 환경에서도 알림 전달을 안정적으로 처리할 수 있습니다.
1. Redis 설정
build.gradle:
implementation 'org.springframework.boot:spring-boot-starter-data-redis'
application.yml:
spring:
  data:
    redis:
      host: localhost
      port: 6379
RedisConfig:
@Configuration
public class RedisConfig {

    @Bean
    public RedisConnectionFactory redisConnectionFactory(
            @Value("${spring.data.redis.host}") String host,
            @Value("${spring.data.redis.port}") int port) {
        return new LettuceConnectionFactory(host, port);
    }

    @Bean
    public RedisTemplate<String, Object> redisTemplate(
            RedisConnectionFactory factory) {

        RedisTemplate<String, Object> template = new RedisTemplate<>();
        template.setConnectionFactory(factory);

        template.setKeySerializer(new StringRedisSerializer());
        template.setValueSerializer(new Jackson2JsonRedisSerializer<>(Object.class));

        return template;
    }
}
2. NotificationService 리팩토링
1) 알림 생성 → Redis로 발행
private void publishNotification(Notification notification) {
    redisTemplate.convertAndSend("notificationTopic", notification);
}
2) Redis 메시지 구독 컨테이너 설정
@Bean
public RedisMessageListenerContainer redisContainer(
        RedisConnectionFactory factory) {

    RedisMessageListenerContainer container = new RedisMessageListenerContainer();
    container.setConnectionFactory(factory);

    container.addMessageListener((message, pattern) -> {
        String body = new String(message.getBody());
        Notification notification = objectMapper.readValue(body, Notification.class);
        sendRealTimeNotification(notification);
    }, new PatternTopic("notificationTopic"));

    return container;
}
이제 어떤 WAS에서 알림이 발생하더라도,
모든 WAS가 같은 메시지를 받아 자신의 SseEmitter로 알림을 전송하게 됩니다.
멀티 서버 환경에서도 정확하게 동작하는 실시간 알림 시스템이 완성됐습니다!
운영 환경에서 고려해야 할 점
Redis Pub/Sub의 한계
Redis Pub/Sub은 가볍고 빠르지만, 본질적으로 영속 메시징 시스템이 아닙니다.
그래서 다음과 같은 제약이 있습니다.
- 메시지 순서를 보장하지 않음
- 네트워크 상황에 따라 메시지 유실 가능성 존재
- 메시지를 저장하지 않아 재처리 불가
정확한 순서 보장, 멱등 처리, 재시도 같은 기능이 필요하다면
Kafka 같은 메시지 브로커를 함께 고려하는 것이 좋습니다.
SSE 운영 팁
SSE를 실서비스에 적용할 때는 다음 사항을 반드시 확인해야 합니다.
- HTTPS 필수 — 중간자 공격(MITM) 방지
- 이벤트 데이터는 서버에서 sanitize 처리
- SSE 타임아웃·재연결 전략 명확히 설정
SseEmitter관리 시 메모리 누수 주의
이런 부분만 챙기면 SSE는 비교적 안정적으로 운영할 수 있습니다.
이번 SSE 기반 실시간 알림 구현은 단순히 기능 하나를 추가한 것이 아니라,
단일 서버 구조에서 멀티 서버 구조로 확장할 때 어떤 문제가 생기고 이를 어떻게 해결할 수 있는지 잘 보여준 사례였습니다.
SSE는 알림처럼 단방향 이벤트 전송에 매우 적합하고,
Redis Pub/Sub은 여러 서버가 상태를 공유해야 하는 환경에서 좋은 해결책이 됩니다.
언젠가 WebSocket 기반 알림 구조나 Kafka 기반 아키텍처도 비교해보면 재미있을 것 같네요.
읽어주셔서 감사합니다!
'Backend > Spring 🌱' 카테고리의 다른 글
| Spring에서 ServiceImpl, 정말 써야 할까요? (0) | 2024.06.14 |
|---|---|
| Redis 캐싱으로 API 성능 개선하기 (0) | 2024.04.01 |
| 스프링 컨테이너 이해하기: BeanFactory와 ApplicationContext (0) | 2024.03.12 |
| Spring MVC에서 HandlerMapping과 HandlerAdapter를 나눈 이유 (0) | 2024.02.07 |
| 이벤트 기반으로 파일 업로드 기능 구현하기 (0) | 2024.02.07 |
안녕하세요, 저는 주니어 개발자 박석희 입니다. 언제든 하단 연락처로 연락주세요 😆


